Image classification is one of the trending applications in machine learning. It has a wide range of applications — from facial recognition algorithms to identifying complex patterns in images like crime detections, and many other social, medical and technical applications.
Image classification is not just about classifying images into categories, it has a broader and deeper meaning of giving machines the power to visualize the world.
In this article, we will play around with a simple Multi-label classification problem. We will use the power of Tensorflow and the simplicity of Keras to build a classifier that is able to categorize the images of cats and dogs and also to identify their respective breeds.
Pre-Requisites :
A basic understanding of Convolutional Neural Networks.
Read some of our previous articles on Convolutional Neural Networks to have a good understanding before we get our hands dirty. Follow the links below:
- Learn Image Classification Using CNN In Keras With Code
- Overview Of Convolutional Neural Network In Image Classification
Getting the Dataset
Head to MachineHack, sign up and start the Who Let The Dogs Out: Pets Breed Classification Hackathon. The datasets can be downloaded from the attachments section. The training set consists of 6206 images of both cats and dogs of different breeds. We will use these images and their respective classes provided in the train.csv file to train our classifier to categorize a given image as either the image of a cat or a dog and also classifying into respective breeds.
Multi-Label Image Classification With Tensorflow And Keras
Note:
- Multi-label classification is a type of classification in which an object can be categorized into more than one class. For example, In the above dataset, we will classify a picture as the image of a dog or cat and also classify the same image based on the breed of the dog or cat.
- Multi-class classification is simply classifying objects into any one of multiple categories. Such as classifying just into either a dog or cat from the dataset above.
Importing Tensorflow and Keras
import tensorflow as tf
from tensorflow.keras.models import Sequential
from tensorflow.keras.layers import Dense, Conv2D, MaxPooling2D, Flatten
import numpy as np
import matplotlib.pyplot as plt
import pandas as pd
print(tf.__version__)
You should be able to see the version of your TensorFlow as the output.
Preparing the training data
To feed the images into the Neural Network we would require the images to be loaded. We are provided with a train.csv file consisting of the image names and the respective categories. We can use the sheet to load the images using the flow_from_dataframe method from Keras, but the method requires the complete filename with the extension of the image. Since we have jpg images we will format all the id’s in train.csv by adding ‘.jpg’ to all rows. We will then create a new training set with 3 columns namely Images, Animal and Breed. Since the Animal and Breed columns are categories we will convert the type to string.
training_set = pd.read_csv("Cats_and_Dogs/Dataset/train.csv")
training_imgs = ["{}.jpg".format(x) for x in list(training_set.id)]
training_labels_1 = list(training_set['class_name'])
training_labels_2 = list(training_set['breed'])
training_set = pd.DataFrame( {'Images': training_imgs,'Animal': training_labels_1, 'Breed' : training_labels_2})
#Changing the type to str
training_set.Animal = training_set.Animal.astype(str)
training_set.Breed = training_set.Breed.astype(str)
Creating a new category
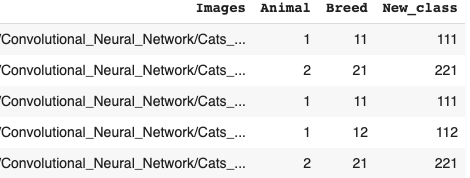
One of the simplest ways to solve a Multi-label Classification problem is by converting it into Multi-class Classification problem. Here we will combine the Animal and Breed categories to form a new set of unique categories and we will call this new feature ‘New_class’.
training_set['New_class'] = training_set['Animal'] + training_set['Breed']
Let’s have a look at our new dataset.
print(training_set.head())
Output:
Preprocessing Images
from tensorflow.keras.preprocessing.image import ImageDataGenerator
train_dataGen = ImageDataGenerator(rescale = 1./255,
shear_range = 0.2,
zoom_range = 0.2,
horizontal_flip = True)
train_generator = train_dataGen.flow_from_dataframe(

                                        dataframe = training_set,

                                        directory="",x_col="Images",

                                        y_col="New_class",

                                        class_mode="categorical",

                                        target_size=(128,128),

                                        batch_size=32)
We will now preprocess the images using Keras’ ImageDataGenerator class which will convert the images into an array of vectors that can be fed to the neural network. A set of features or parameters can be initialized to the ImageDataGenerator such as rescale, shear_range, zoom_range etc. These parameters help in extracting maximum features from an image.
The flow_from_dataframe method allows us to import images from a data frame provided the path of the images using the parameter ‘directory’. The x_col specifies the independent factor which is an image and y_col represents the dependent factor which is the category of the image that we need to predict. The target size will be the size of the resulting images from the ImageDataGenerator object, batch_size is the number of sample images used to train at once.
You will get an output like what’s shown below:
Found 6206 validated image filenames belonging to 10 classes.
Building Convolutional Neural Network
We are done processing the image data. Now we can proceed to build a simple convolutional neural network. Keras allows us to build neural networks effortlessly with a couple of classes and methods.
classifier = Sequential()
The Sequential class initializes a network to which we can add layers and nodes.
#First Convolutional layer
classifier.add(Convolution2D(filters = 56,kernel_size = (3,3), activation = 'relu', input_shape = (128,128,3)))
The add method allows us to add layers of nodes to the initialized network. In the above code, we added a Convolutional layer to the network. The convolution will be performed using a 3×3 matrix as specified with the kernel _size parameter. The activation parameter sets the activation function for the nodes. The input size should be same as the size of the outputs from the ImageDataGenerator (3 is the channel width).
classifier.add(MaxPooling2D(pool_size = (2,2)))
The above code adds a pooling layer to the network.
We can add as many layers as we want as shown below, however, this puts a lot of pressure on the system resources. Choose the layers and nodes based on the capability of the machines.
#second Convolutional layer
classifier.add(Convolution2D(32,(3,3),activation = 'relu'))
classifier.add(MaxPooling2D(pool_size = (2,2)))
The line below adds a Flattening layer to the network.
#Flattening
classifier.add(Flatten())
Next, we will add a hidden layer and an output layer to complete the network as done with the following code blocks.
#Hidden Layer
classifier.add(Dense(units = 64, activation = 'relu'))
#Output Layer
classifier.add(Dense(units = 10 , activation = 'softmax'))
We will now compile the network to initialize the metrics, loss and weights for the network
classifier.compile(optimizer = 'adam', loss = 'categorical_crossentropy', metrics = ['categorical_accuracy','accuracy'])
Let’s have a look at the description of our CNN :
classifier.summary()
Output:

Training the CNN
classifier.fit_generator(train_generator, epochs = 50, steps_per_epoch = 60 )
Output:

The fit_generator method will train the classifier with the data we gathered by processing the images using ImageDataGenerator class. The epochs are the number of times the cycle of training repeats. Steps-per-epoch determines the number of times the weights of each node should be updated for decreasing the loss.
Predicting For Test Set
Preparing Test Data
We will prepare the test data by adding the path and file extension to the original test_set. This will help us load the images directly from the csv file using the load_img() method that you will see in the following code blocks.
test_set = pd.read_csv("Cats_and_Dogs/Dataset/test.csv")
test_imgs = ["Cats_and_Dogs/Dataset/images_test/{}.jpg".format(x) for x in list(test_set.id)]
test_set = pd.DataFrame( {'Images': test_imgs })
Identifying the trained classes
The train_generator consists of the complete trained image data. Let’s have a look at the unique categories in the training data using the class_indices attribute of the train_generator.
classes = train_generator.class_indices
print(classes)
Output:
{'111': 0, '112': 1, '113': 2, '114': 3, '115': 4, '221': 5, '222': 6, '223': 7, '224': 8, '225': 9}
Our model will be predicting the labels in the range 0 to 9 based on the above dictionary for each category. We will need to reverse these to the original classes. We will use a reverse of the above dictionary to later convert the predictions to actual classes. The dictionary can be inverted with the following line of code:
inverted_classes = dict(map(reversed, classes.items()))
print(Inverted_classes)
Output:
{0: '111', 1: '112', 2: '113', 3: '114', 4: '115', 5: '221', 6: '222', 7: '223', 8: '224', 9: '225'}
Predicting classes
Now it’s time to load the images one by one and predict and store the category of each image from the test_set.
from keras.preprocessing import image
Y_pred = []
for i in range(len(test_set)):
img = image.load_img(path= test_set.Images[i],target_size=(256,256,3))
img = image.img_to_array(img)
test_img = img.reshape((1,256,256,3))
img_class = classifier.predict_classes(test_img)
prediction = img_class[0]
Y_pred.append(prediction)
The above code block loads each image from the test set preprocess it and feeds it to the classifier to predict. The predictions are stored in a list called y_pred. Notice that all the image sizes (256,256) are the same as we did for the training set, this is important and otherwise would result in an error.
Let’s take a look at the predictions:
print(Y_pred)
Output:
[4, 3, 9, 1, 1, 9, 2, 7, 8, 6, 8, 6, 6, 0, 1, 6, 0, 9, 7, 0, 7, ...]
We can see that the predictions are in the range of 0 to 9. We can now use the inverted_classes dictionary to convert the predicted labels into actual categories.
prediction_classes = [ inverted_classes.get(item,item) for item in Y_pred ]
Now if we look at the prediction_classes, we will be able to see the actual categories we used to train our classifier with.
print(prediction_classes)
Output:
['115', '114', '225', '112', '112', '225', '113', '223', '224', '224', ....]
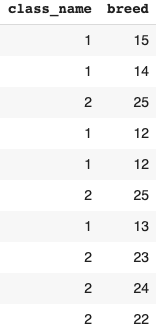
There is one more thing to do. Remember, the original training set provided had 2 categories, class_name and breed which we later renamed as Animal and Breed. So we will now need to split the predicted categories into class_name and breed (Animal and Breed).
animal = []
breed = []
for i in prediction_classes:
animal.append(i[0]) # First character = class_name/Animal
breed.append(i[1:]) # Last 2 characters = breed/Breed
Creating a dataframe for the predictions and writing it to an excel
predictions = {}
predictions['class_name'] = animal
predictions['breed'] = breed
Let’s have a look at the predicted classes:
#Writing to excel
pd.DataFrame(predictions).to_excel("Cats_and_Dogs/Predictions/predictionss.xlsx", index = False)
Finally, you can upload the excel at MachineHack to see your score on the leaderboard.
Tweak the parameters of the Convolutional Neural Network to achieve a good score and submit your predictions at MachineHack. Enjoy MachineHacking!